Paper Bat Wall Decorations: A Simple Flying Colony
Cut black cardstock bats in three sizes, crease the wings for a 3D lift and arrange them in a rising swarm that looks like it is flying out of a corner.

Tutorial at a glance
Materials
- Black cardstock, 4 to 6 sheets
- Sharp scissors
- White pencil or chalk marker
- Thin cardboard for templates
- Removable adhesive putty or clear tape
Paper bat decorations are about as simple as Halloween decor gets: black cardstock, scissors and a blank wall. Arranged well, a few dozen of them look like a colony pouring out of a corner and sweeping up toward the ceiling.
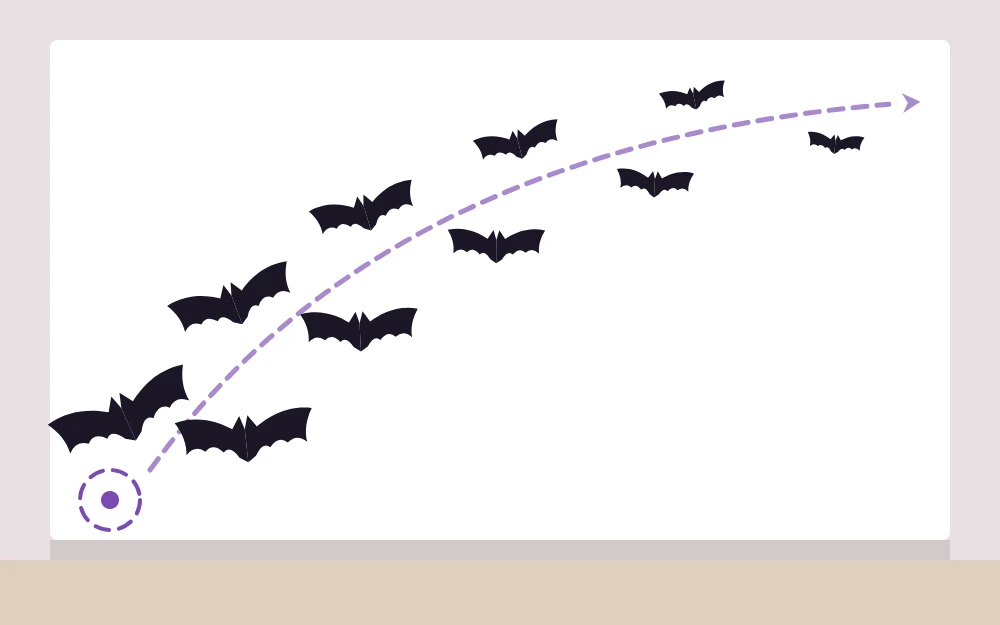
The arrangement is what makes the difference. Bats stuck up in neat rows look like wallpaper; bats in three sizes, tilted in different directions and rising along a loose curve look like they are moving. This tutorial covers both halves, the cutting and the layout.
What You Need
- Black cardstock, about 4 to 6 letter-size sheets for a colony of roughly 25 bats
- Sharp scissors
- A white pencil or chalk marker
- Thin cardboard for three templates
- Removable adhesive putty, or clear tape for tape loops
- A ruler
Cardstock matters here. Ordinary paper is too soft to hold a creased wing, and the bats will droop flat against the wall within a day or two.
Step 1: Make Three Templates
Three sizes give the swarm a sense of distance, with large bats seeming close and small ones far away. Aim for wingspans of roughly these widths:
- Large: about 8 inches (20 cm)
- Medium: about 6 inches (15 cm)
- Small: about 4 inches (10 cm)
For each size, fold a piece of thin cardboard in half and draw half a bat against the fold: half of a small oval body, one pointed ear, and one wing with a gently curved top edge and three scallops underneath. Cut through both layers and unfold. Keep the outline simple, since fine points tear and do not show from across the room.
If you would like more help with drawing the outline or getting smooth scallops, the guide on how to cut clean Halloween shapes goes through the fold method in detail.
Step 2: Trace and Cut the Bats
- Fold a sheet of black cardstock in half lengthwise.
- Fold your template closed and lay its fold against the fold of the cardstock. Trace around it with the white pencil.
- Repeat along the fold, fitting in as many half-bats as you can. Stagger sizes to use the space.
- Cut through both layers, turning the cardstock into the scissors on the curves.
- Unfold each bat. The tracing lines are now on the inside of the fold, which will face the wall.
For a colony of about 25, try roughly 5 large, 8 medium and 12 small. An odd total tends to look more natural than an even one, and having more small bats than large keeps the swarm light at its far end.
Step 3: Crease the Wings
The center fold already runs down each bat’s body. Sharpen it by running a fingernail along the crease, then open the wings to a wide V so they angle away from the body.
For more lift, add a second, softer bend. Fold each wing gently back the other way about halfway along its length, so that from the side the bat makes a shallow M shape. Only the narrow strip along the body will touch the wall, and the wingtips will stand away from it and cast small shadows.

Step 4: Plan the Swarm
Before anything touches the wall, decide on a starting point and a direction. The most convincing layouts begin low, in a corner or beside a piece of furniture, a door frame or a mirror, and rise diagonally up and outward.
Picture a loose, slightly curved band, narrow and dense where it starts and wider and sparser as it climbs. Keep the whole arrangement within comfortable reach from the floor; a swarm that fades out at about arm’s height looks complete and needs no climbing.
Layout rules that work
- Larger bats low, smaller bats high. The size change creates the feeling of distance.
- Vary direction. Tilt each bat a little differently, but keep most heads pointing roughly along the path of flight.
- Uneven spacing. Cluster two or three close together, then leave a gap. Equal spacing looks like a grid.
- Let a few stray. One or two small bats set apart from the main band make the group look alive.
Tip
Lay the bats out on the floor first in the shape you plan to make, then transfer them to the wall one at a time, starting with the large ones. It is much easier to rearrange on the floor.
Step 5: Attach the Bats
Two methods are gentle on most walls:
- Removable adhesive putty. Roll a piece about the size of a small pea, press it onto the back of the body crease, then press the bat to the wall for a few seconds.
- Tape loops. Roll a short piece of clear tape into a loop, sticky side out, and press it flat behind the body.
In both cases, stick only the center strip so the wings stay free. Wall finishes vary, and some paints, wallpapers and fresh paintwork can mark or lift, so test one bat in a hidden spot for a day before putting up the full colony.
Step back after every five or six bats. Gaps and clumps are obvious from across the room and almost invisible up close.
Where a Bat Colony Looks Best
Bats need pale, uncluttered wall space to show up. Good spots include the wall above a console table or sofa, the side of a staircase at reachable height, around a mirror, or flowing out from a doorway.
Above a fireplace they pair naturally with pumpkins and battery lights on the shelf below; the guide to Halloween mantel decor shows how to build that kind of layered display. Paper bats are for unused fireplaces or walls well away from heat, and any glow near them should be battery or LED only.
Spare bats are easy to use up. Thread a handful onto twine, or follow the paper Halloween garland tutorial to turn leftover cardstock into a matching string for a shelf or doorway.
Taking Them Down and Storing Them
Peel each bat away slowly, rolling the putty off the wall with a thumb instead of pulling straight out. Dab any residue with a larger ball of the same putty.
Close the wings along the center fold and stack the bats by size inside a book or a flat envelope. Stored flat and dry, they can go straight back up next year with fresh putty; re-crease the wings when you take them out.
Frequently asked questions
How many paper bats do I need for a wall?
Around 25 bats fill a section of wall roughly 4 to 5 feet (1.2 to 1.5 m) wide with a loose swarm. A small accent beside a mirror or doorway can work with 9 to 11. Cut a few more than you plan to use so you can fill gaps once the layout is up.
Will adhesive putty damage my wall paint?
Removable putty is gentle on many painted walls, but results depend on the finish, the age of the paint and how long the putty stays in place. Test a single bat in a hidden spot for a day first. When removing, roll the putty off slowly instead of pulling it straight away from the wall.
How do I make paper bats look three-dimensional?
Use cardstock, keep the fold down the center of the body, and open the wings into a V. Add a gentle reverse bend halfway along each wing for more shape. Then stick only the center strip to the wall, so the wingtips stand free and cast small shadows.